Decoupling Drupal 8 core: Core REST, HAL, and setting up Drupal as a web services provider
March 29, 2018Reprinted from the Acquia Developer Center with permission from DC Denison (Senior Editor, Acquia).
Perhaps the most critical piece of any decoupled CMS architecture is the API layer which exposes data in the back end for consumption by other applications. In Drupal's case, the REST module (also known as the RESTful Web Services module) in Drupal 8 core fulfills this responsibility. The REST module contains important logic that drives the availability of data through formatted responses.
Nevertheless, in many cases, what is provided in Drupal core might not be the most suited to your needs. For instance, the Hypertext Application Language (HAL) specification includes links to other resources, information that might be superfluous in a setting where payload size needs to be as minimal as possible. Fortunately, Drupal's wider web services ecosystem, which I'll discuss next week, incorporates API optionality across a diverse range of specifications like JSON API, GraphQL, and CouchDB.
In this Experience Express column, we're zeroing in on core REST because it is available off the shelf in any Drupal installation and doesn't require significant configuration to enable content exposure via REST API. Today, we are diving into the REST module in Drupal 8 and the HAL specification and its corresponding module before embarking on setting up and configuring Drupal 8 as a web services provider with cross-origin resource sharing (CORS). Finally, we'll discuss the helpful REST UI module as we expand our understanding of the fundamentals underpinning Drupal's web services.
The RESTful Web Services module
Inspired by the REStful Web Services module in Drupal 7 (to be covered in a future installment), the REST module also depends on the Serialization module in Drupal 8 core. In short, the REST module provides a customizable and extensible REST API exposing data that is managed by Drupal. In this section, the REST module and its API will be covered, but retrieving and manipulating data directly (CRUD) and advanced features such as resource plugins will be discussed later.
Out of the box, the REST module allows you to interact via HTTP methods (like
GETPOSTDELETEGETThe RESTful Web Services API
Within the REST module are several APIs that can be used to extend the functionality of Drupal's core REST API out of the box. The RESTful Web Services module's API consists of the internal interfaces available to Drupal developers and is not to be confused with the REST API that it provides for other applications.
This section explores one of the two essential APIs which Drupal developers have access to: REST resource configuration. The other API, which handles resource plugins that developers implement to add additional resources to available defaults, will be covered in a future installment.
Configuring REST resources
First, every REST resource — whether it represents a content entity or configuration entity — has its own configuration entity (
\Drupal\rest\RestResourceConfigInterface@RestResourceBecause REST resources have corresponding configuration entities, they can be configured in the same way as other configuration entities. For instance, you can configure which HTTP methods, serialization formats, and authentication mechanisms a particular REST resource supports. Designated serialization formats and authentication mechanisms are then made available to the selected HTTP methods in configuration.
You can either use the REST UI module to configure REST resources via a graphical user interface, or you can modify and import configuration YAML by hand with
core/modules/rest/config/optional/rest.resource.entity.node.ymlUsing the RESTful Web Services module
When conceiving an architecture with multiple clients requiring Drupal data, you will typically expose data by allowing access to resources with user roles and permissions and by customizing a REST resource's format and authentication mechanism as desired.
Exposing resources with Entity Access
Drupal 8 contains a robust user roles and permissions systems that maps neatly onto permissions for access to exposed REST resources. For REST resources that expose content entities, the Entity Access API is responsible for determining whether a role can retrieve or manipulate that content entity.
For example, in order to issue
GETPOSTFor applications handling sensitive user data, this is a crucial feature and should be paired with appropriate authentication methods like that provided by Simple OAuth, which ties user roles and their respective permissions to individual client applications. Authentication mechanisms will be discussed in a future installment.
Customizing a REST resource's format and authentication
By default, the REST module supports two serialization formats:
jsonxmlHere is an example of configuring available formats and authentication mechanisms in YAML:
granularity: resource
configuration:
  methods:
    - …
  formats:
    - hal_json
    - xml
    - json
  authentication:
    - cookie
Note: In the case of progressive decoupling, cookie-based authentication is relevant, as the client application and Drupal front end are present in the same browser session. In cookie-based authentication, the authenticated Drupal user will have a cookie present, which a JavaScript application can then employ to perform authentication against the Drupal REST API.
All of this configuration can also be done using the REST UI module, as we'll see shortly.
Hypertext Application Language (HAL)
For client applications seeking to consume data normalized as HAL-compliant JSON, the Hypertext Application Language (HAL) specification dictates how data structures should look. When enabled, the HAL module in Drupal 8 core normalizes entities using HAL.
The HAL specification, like JSON-LD, specifically addresses a key need that many web APIs face: the ability to hyperlink across multiple resources to provide links to other relevant resources in a single API response for the benefit of clients. HAL is a generic media type that provides for web APIs exposed as a "series of links". API consumers can then traverse those hyperlinks to progress through application states.
Among the clearest benefits of adopting a specification such as HAL for API responses is the availability of surrounding tooling. A HAL browser, for instance, provides developers the ability to "test-drive" their site and inspect how JSON is formatted with a convenient user interface.
For more details about HAL itself, you can see the latest draft specification.
Setting up Drupal 8 as a web services provider
Now that some of the foundations are clear, we can now turn to setting up Drupal 8 as a web services provider from start to finish. In this section, we'll undertake a step-by-step process from downloading and installing Drupal to configuring core REST both manually and with the REST UI module. To begin, we'll need a local copy of the most recent version of Drupal.
In the directory that you plan to integrate into your local development environment, clone the Git repository for Drupal and checkout the most recent minor release branch (
8.5.xcomposer install$ mkdir core-rest && cd core-rest
$ git clone git@github.com:drupal/drupal.git
$ cd drupal
$ git checkout 8.5.x
$ composer installThen, you can provision a new site in your chosen local development environment with the downloaded codebase. In these examples I use Acquia Dev Desktop. When you select the "+" button in the lower left, you can select the option Import local Drupal site. Insert all the appropriate information, as shown below.
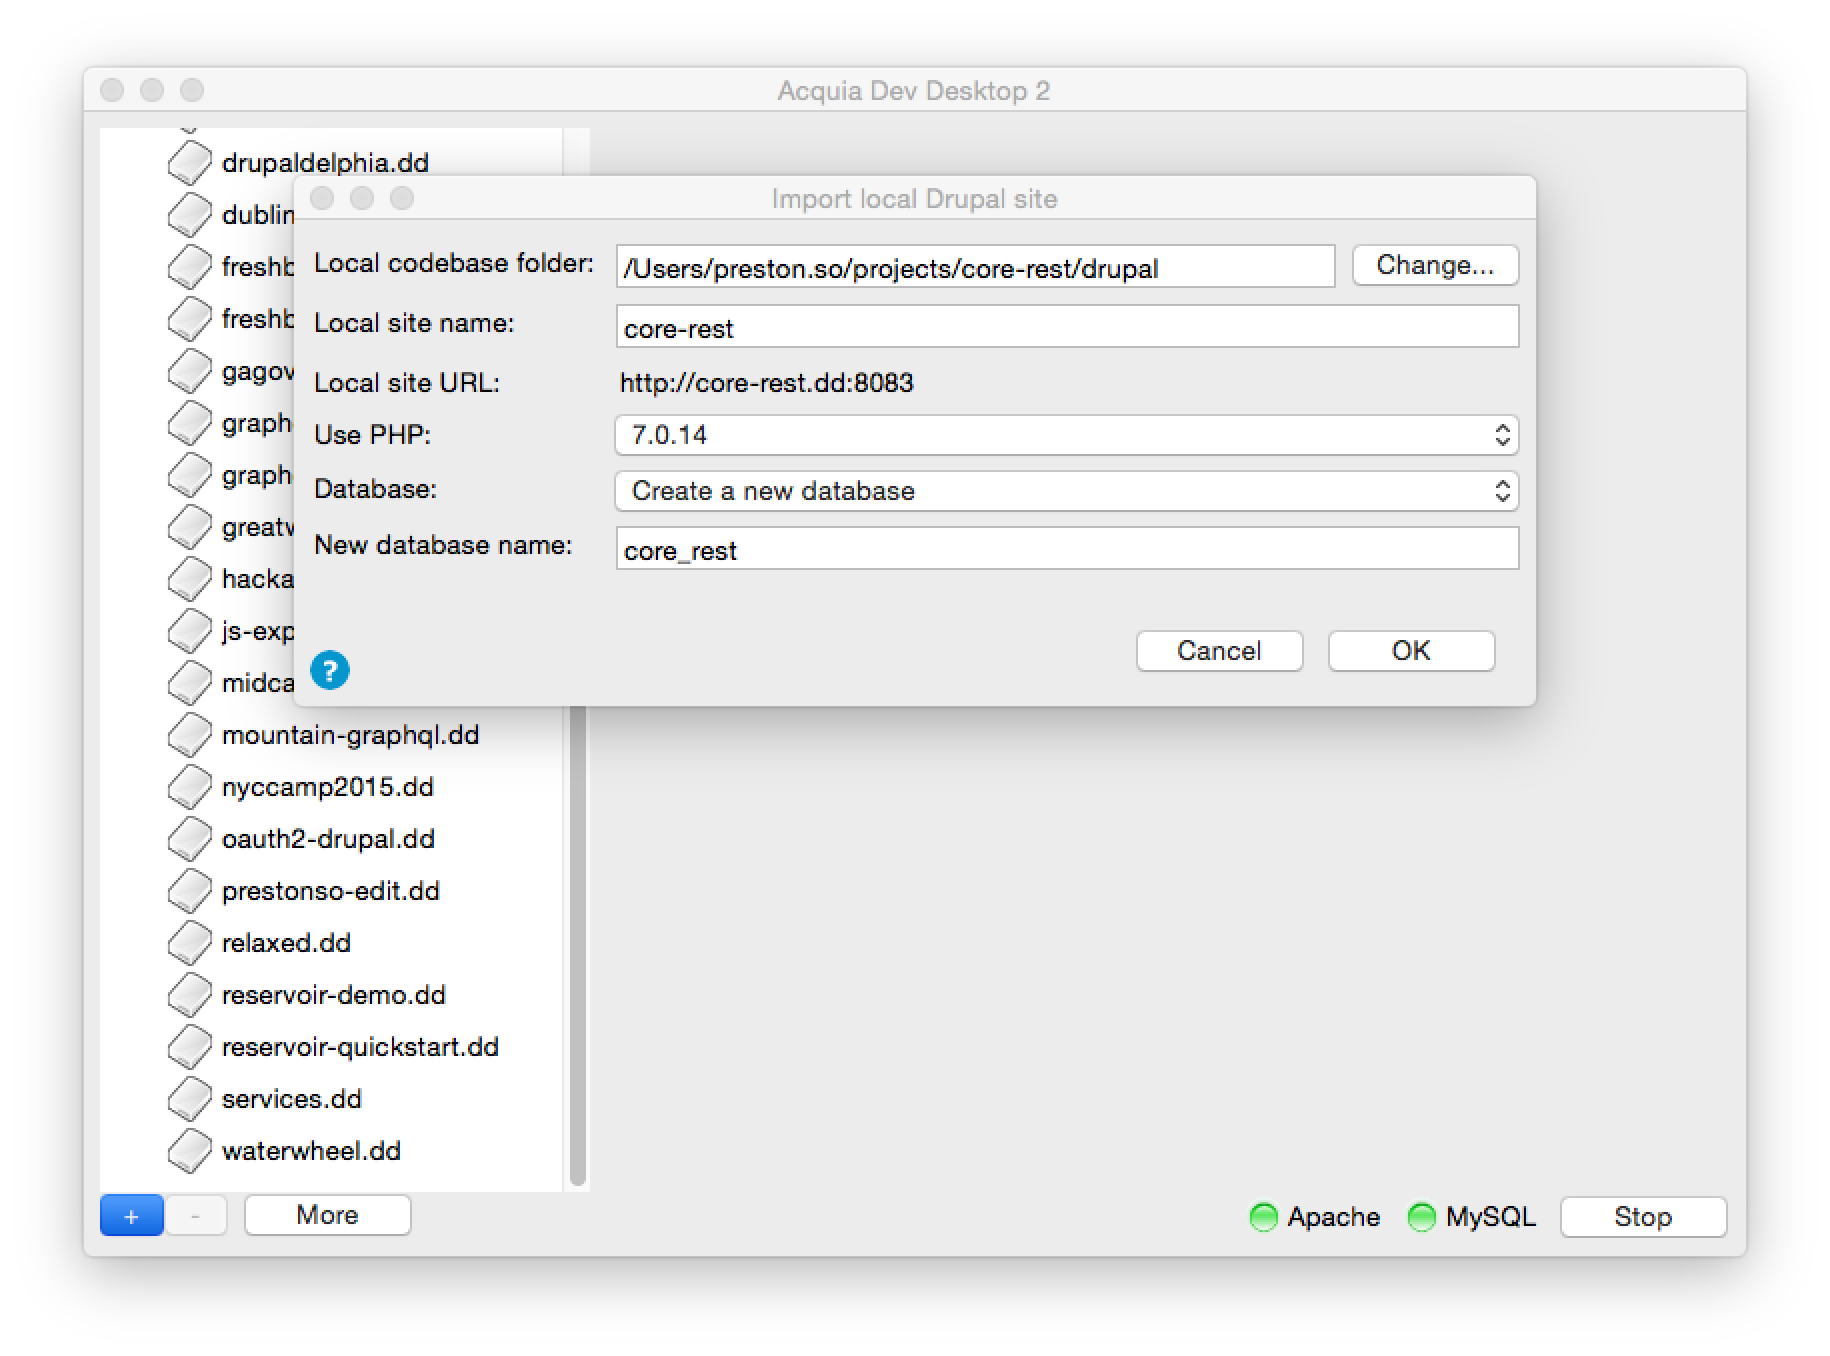
You can now install Drupal normally, whether through Drush, Drupal Console, or manually at
/core/install.php/core/install.phpautoload.phpcomposer installYou may also wish to add some content to your Drupal site, which can be done manually or using the Devel Generate submodule of Devel. The following commands create 20 nodes and 20 users.
$ drush dl devel && drush en -y devel
$ drush en -y devel_generate
$ drush genc 20 && drush genu 20
After installing the site normally and adding content, you now have a Drupal website with content. However, we still need to enable the modules responsible for providing the core REST API. You can do this either at the Extend page (
/admin/modules$ drush en -y serialization hal rest basic_authNow that we have created content and enabled the core REST modules, you can navigate to
core-rest.dd:8083/node/1?_format=jsonNot acceptable format: jsonConfiguring core REST
In order for us to expose our REST resources to consumer applications, we must first configure REST using the approach outlined earlier. For instance, to expose nodes of type Article to the API, we need to ensure that the node REST resource is configured appropriately.
An example configuration YAML file for REST resources is located at
/core/modules/rest/config/optional/rest.resource.entity.node.ymllangcode: en
status: true
dependencies:
module:
- basic_auth
- hal
- node
id: entity.node
plugin_id: 'entity:node'
granularity: resource
configuration:
methods:
- GET
- POST
- PATCH
- DELETE
formats:
- hal_json
authentication:
- basic_authTo provide this configuration to Drupal, we need to navigate to Manage » Configuration » Development » Configuration synchronization (
/admin/config/development/configuration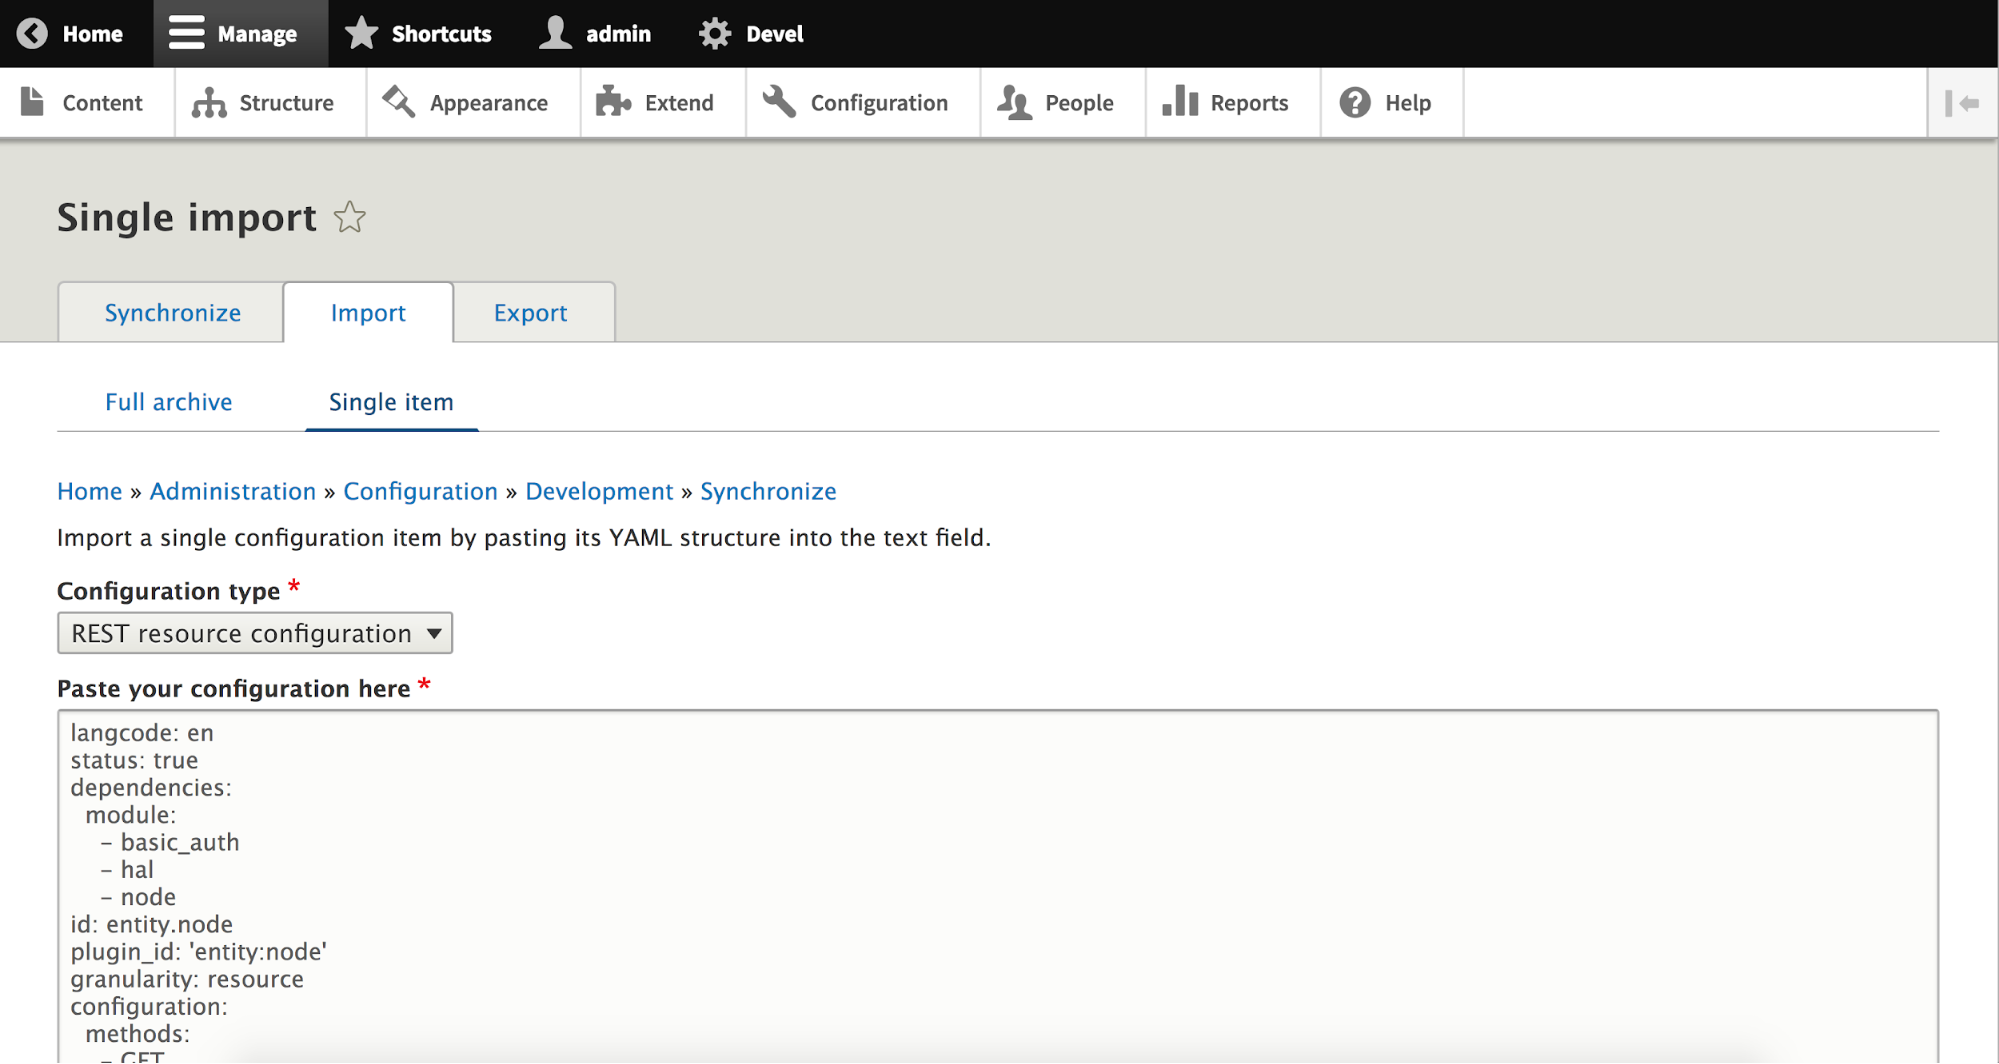
Now that we have imported the appropriate configuration, we can now test requests against the REST API we have just created. To do this more robustly than in the browser, we'll use the Postman REST client, a tool that allows us to issue arbitrary requests against HTTP APIs. Postman is an incredibly powerful application that can replace cURL in your toolbox, and we'll be using it throughout this series to test requests.
In Postman, you can create and issue requests like the one below: a
GETcore-rest.dd:8083/node/1?_format=hal_jsonCongratulations! You have successfully issued your first
GET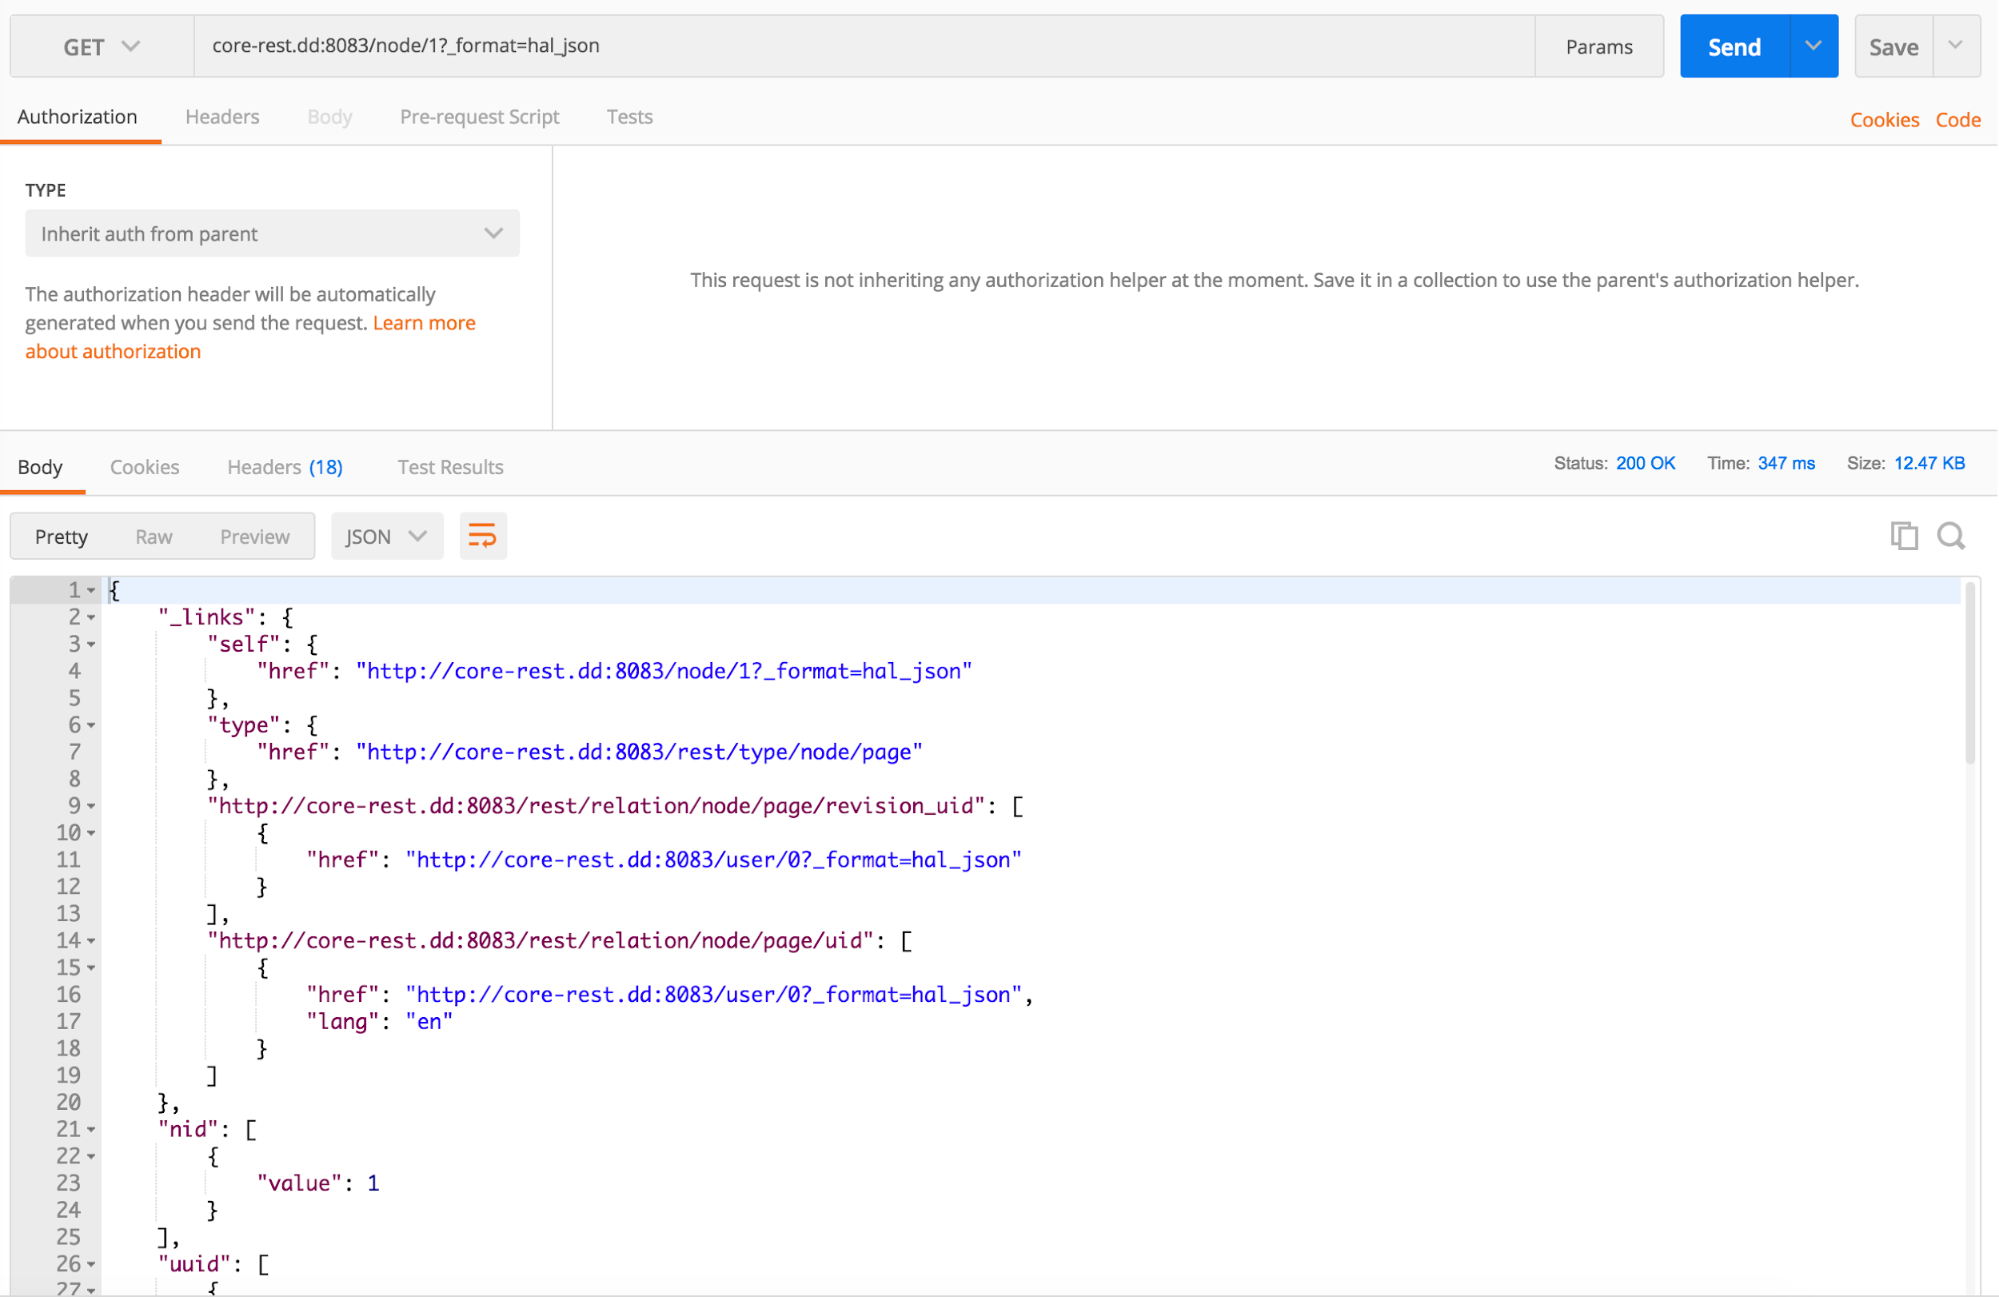
Configuring CORS
Although we now have a fully functioning REST API thanks to configuring Drupal 8 core, we should not deploy this API to production as it currently stands. If we are building our application on another domain, there is no way for it to retrieve data from the Drupal REST API. The reason for this is the same-origin policy, a concept that prevents requests from other domains from accessing content on your domain. In short, it prevents your data from falling victim to unwanted prying eyes or to instigators of distributed denial-of-service (DDoS) attacks.
Cross-origin resource sharing (CORS) functions by allowing user agents (in this case, API consumers) to access selected resources from a different domain than the originator of the request via HTTP headers. For instance, a request to my-decoupled-backend.com from my-decoupled-app.net would be blocked by default without the appropriate headers.
In Drupal, all requests that come from different domains are blocked by default for security reasons. However, using site settings, you can allow either all or specific domains to access particular methods or routes in Drupal that will expose your API for consumers on different origins. Consider the following selection from
sites/default/default.services.yml
  # Configure Cross-Site HTTP requests (CORS).
   # Read https://developer.mozilla.org/en-US/docs/Web/HTTP/Access_control_CORS
   # for more information about the topic in general.
   # Note: By default the configuration is disabled.
  cors.config:
    enabled: false
    # Specify allowed headers, like 'x-allowed-header'.
    allowedHeaders: []
    # Specify allowed request methods, specify ['*'] to allow all possible ones.
    allowedMethods: []
    # Configure requests allowed from specific origins.
    allowedOrigins: ['*']
    # Sets the Access-Control-Expose-Headers header.
    exposedHeaders: false
    # Sets the Access-Control-Max-Age header.
    maxAge: false
    # Sets the Access-Control-Allow-Credentials header.
    supportsCredentials: false
To override the default CORS setting (disabled by default), copy
default.services.ymlservices.ymlcors.config:
enabled: false
allowedHeaders: ['*']
allowedMethods: ['GET', 'POST', 'PATCH', 'DELETE']
allowedOrigins: ['*']
exposedHeaders: false
maxAge: false
supportsCredentials: falseIn this example, the API is quite a bit more private and only allows incoming requests having certain headers, implementing
GETcors.config:
enabled: false
allowedHeaders: ['x-csrf-token', 'authorization', 'content-type', 'accept', 'origin', 'x-requested-with']
allowedMethods: ['GET']
allowedOrigins: ['https://my-decoupled-app.net']
exposedHeaders: false
maxAge: false
supportsCredentials: falseWhereas Drupal makes this easy through YAML, your infrastructure may require additional steps, for instance on Apache or Nginx. If you encounter CORS errors even after applying this settings change and after rebuilding the cache registry, you may be facing an issue upstream with your web server configuration and its issuance of CORS header responses.
Note: While a CORS module existed for Drupal 8 implementations prior to Drupal 8.2.0, due to the introduction of opt-in CORS support in that release according to the steps above, the CORS module is now deprecated in favor of core's CORS support.
Using the REST UI module
While it is important to understand the underbelly of REST configuration in order to grasp how it integrates with the rest of Drupal's configuration system, the REST UI module can accelerate your configuration by providing a handy user interface that obviates the need to touch Drupal's configuration import page. This can be particularly useful for users who aren't as experienced in Drupal.
The REST UI module can be installed using the default approach or using Drush or Drupal Console. A cache registry rebuild may be required:
$ drush dl restui && drush en -y restui
$ drush cr
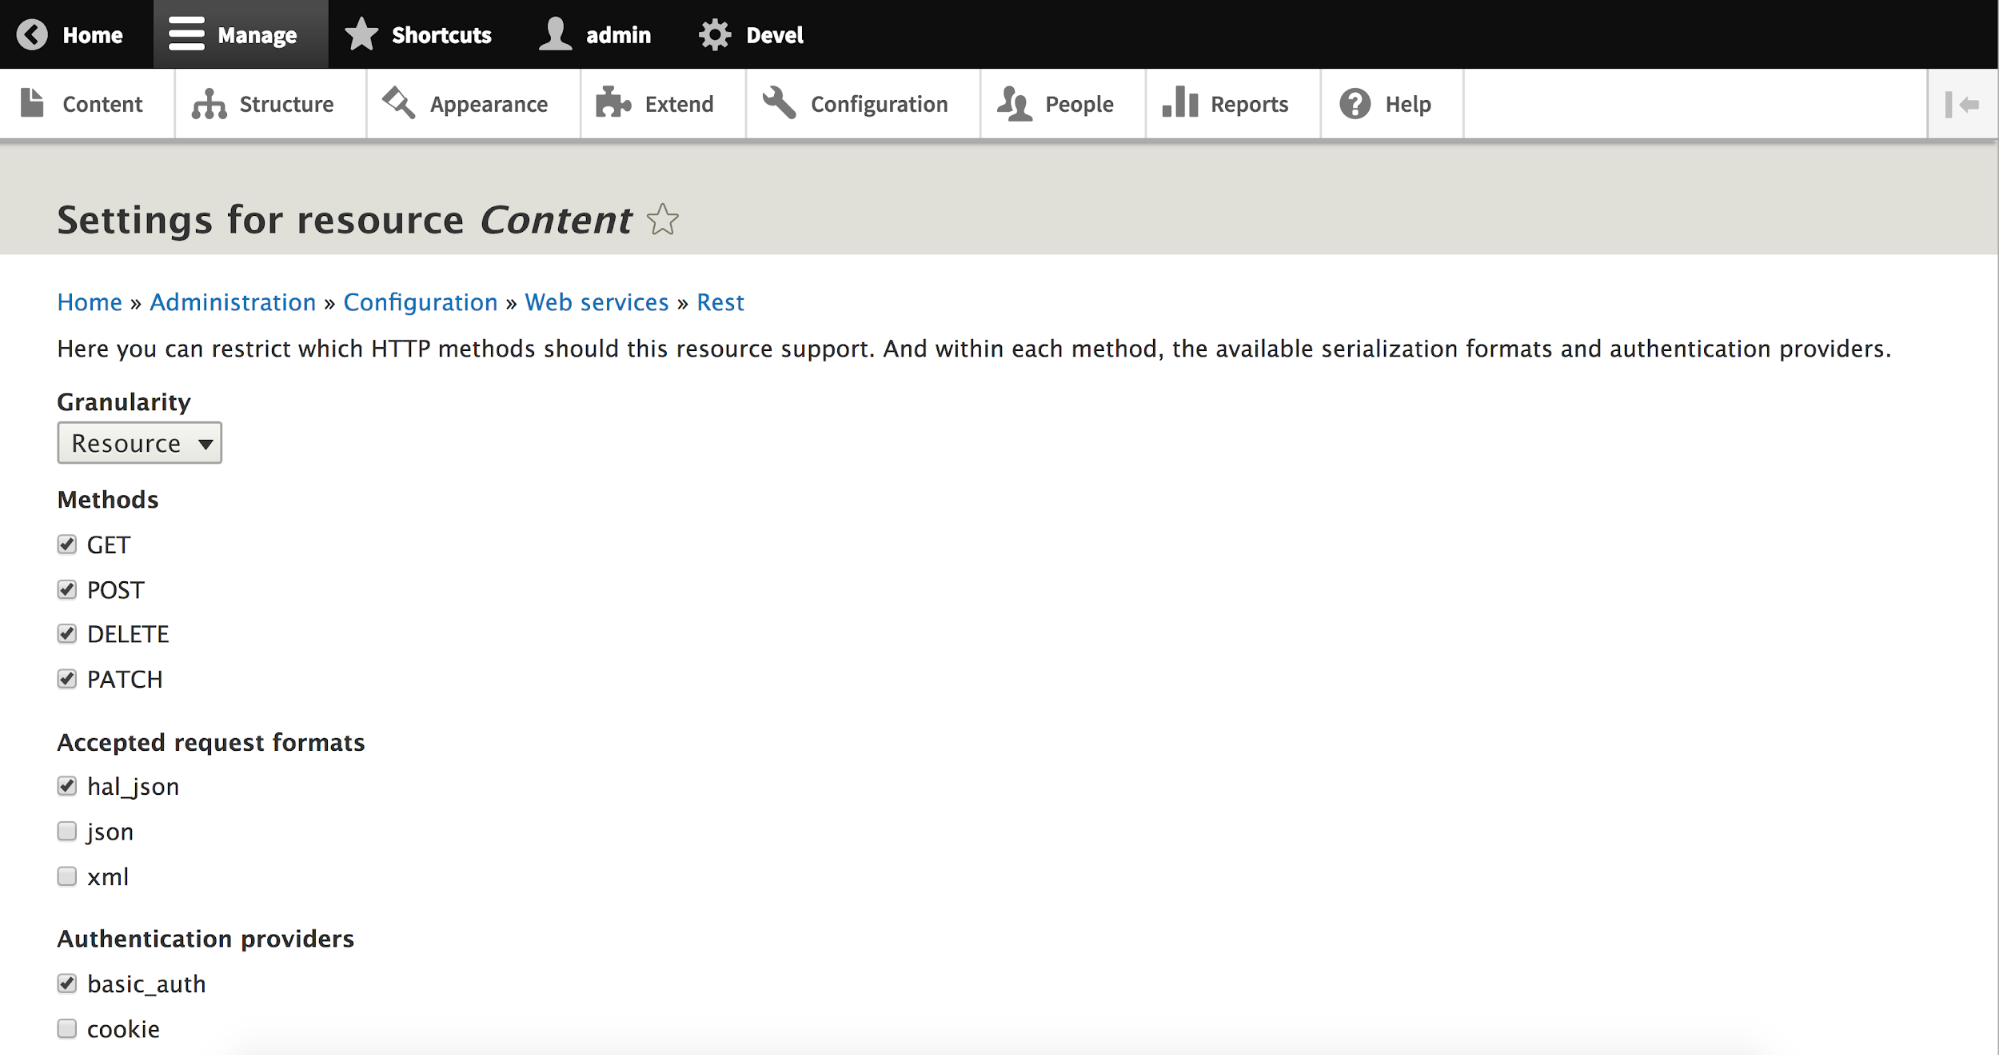
Then, when you navigate to Manage » Configuration (
/admin/config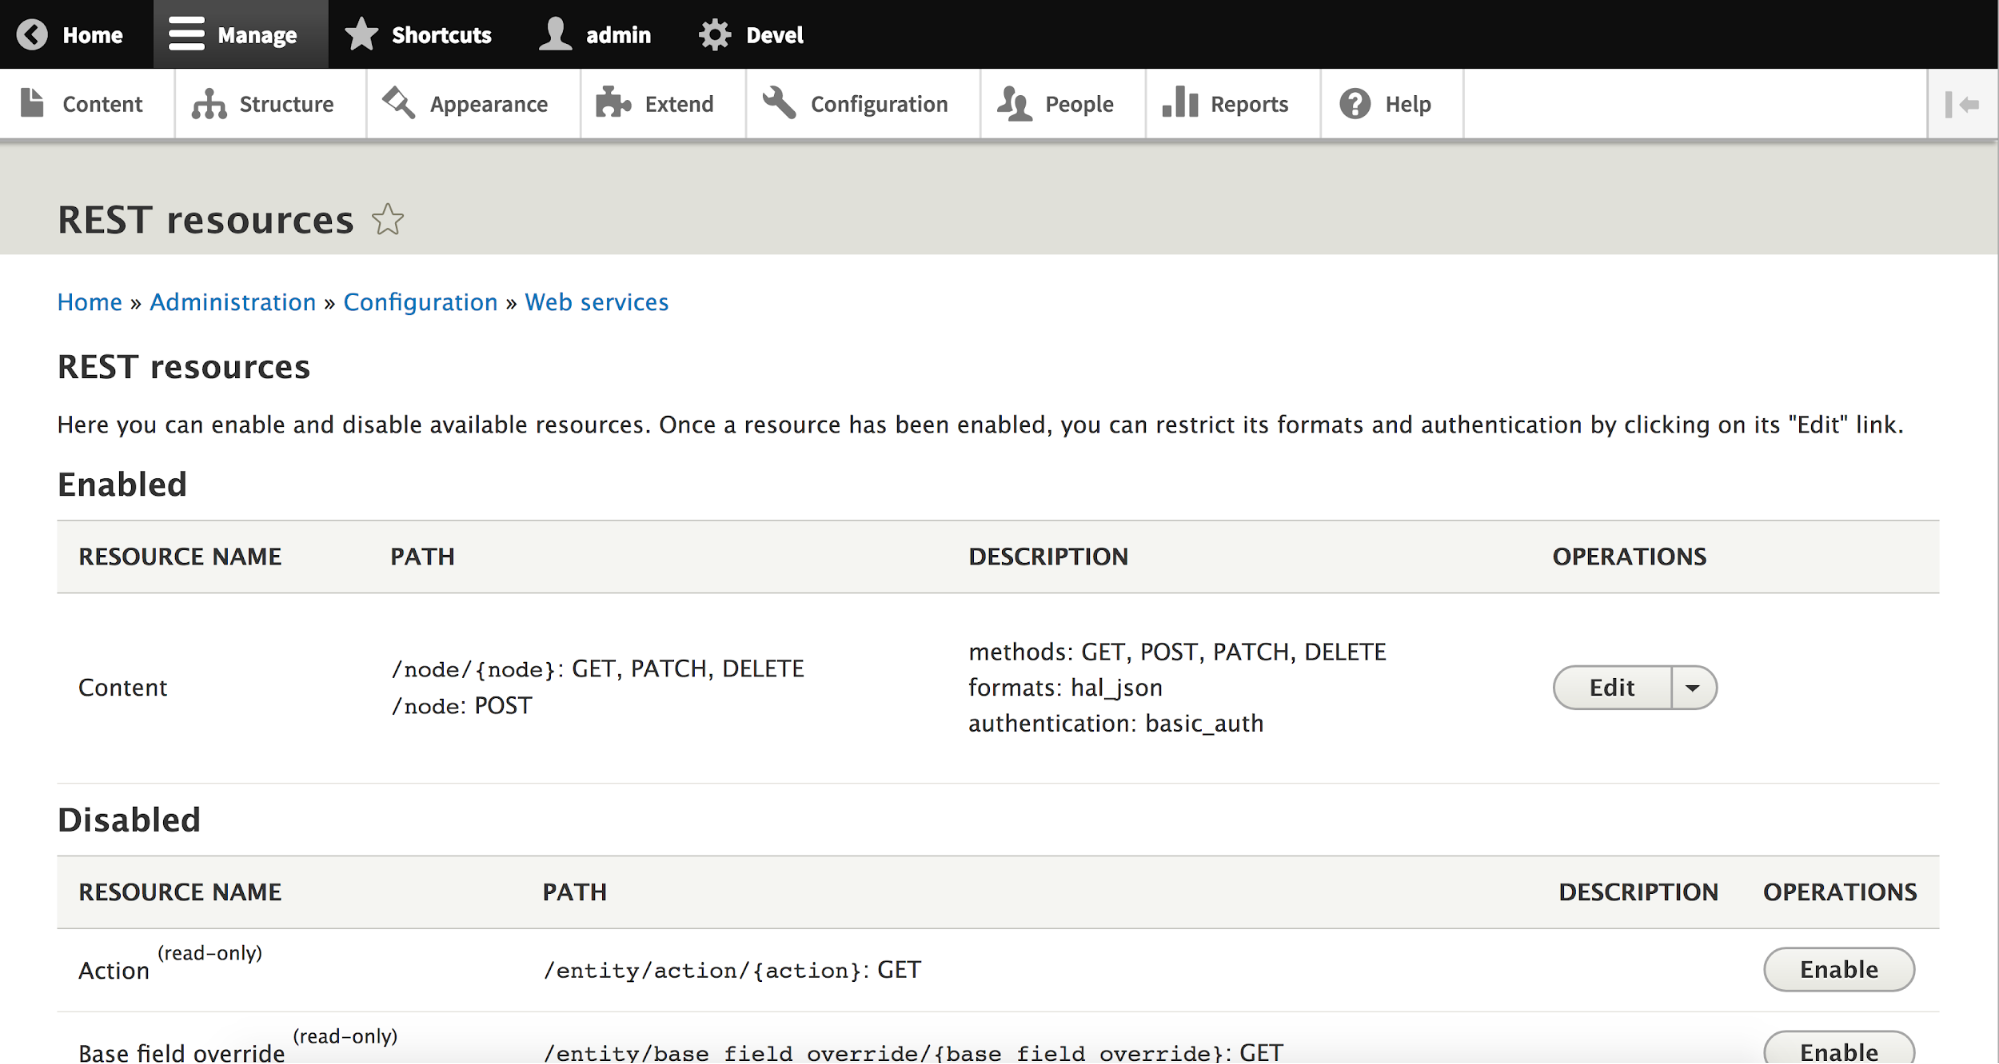
With each resource type, you can edit its configuration using an interface which replicates the structure of the configuration imported earlier rather than employing the configuration system in Drupal. Thanks to the REST UI module, it is much easier to configure REST resources in a manageable way.
Conclusion
Thanks to the inclusion of the RESTful Web Services and HAL modules in Drupal 8 core, there is a wide bevy of tools that you can use to expose REST APIs for your consumer applications. In this column, we also covered setting up Drupal 8 as a web services provider, configuring core REST, configuring CORS, testing the core REST API, and using the REST UI contributed module.
In the next installment of Experience Express, we'll pick up right where we left off to dive into how to retrieve and manipulate content via core REST, armed with the Postman REST client. Thereafter, we'll zoom out to the overall web services ecosystem available for Drupal and turn our attention first to the JSON API module, where progress is advancing at a steady clip.
Special thanks to Wim Leers, who is the original author of much of the documentation used for this column.
Works cited:
"RESTful Web Services module overview." Drupal.org. 9 November 2016. Accessed 23 March 2018.
"RESTful Web Services API overview." Drupal.org. 5 March 2018. Accessed 23 March 2018.